
Using Marketplace Management you are able to manage the available quantities within your catalog one by one or in bulk. Normally we expect Marketplace Management to be the "quantity source" for your sales channels so it is important to understand how quantities can be updated and managed. You can update your quantities in bulk at any time with a flat file upload.
We can establish your settings to allow for your integrated Sales Channels to update Marketplace Management with quantity. (Click Here for more information)
Uploading Steps:
Before getting started:
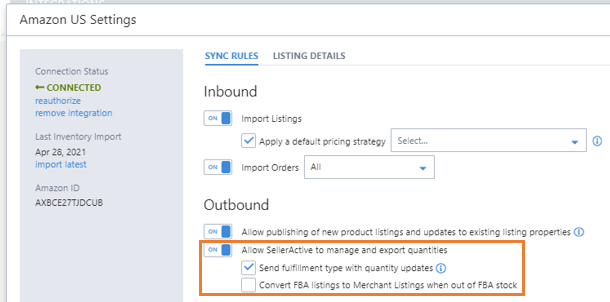
Make sure that your Outbound settings are ON for updating quantities.
Our import process does not accept .CSV files at this time.
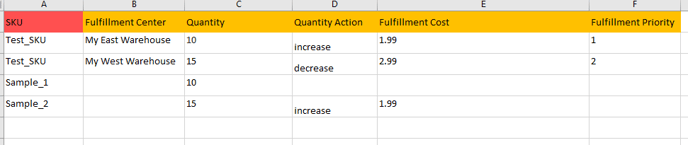
- Generate your flat file that will include the SKU, the Quantity you need to replace or modify with, the Fulfillment Center (when applicable), and the Fulfillment Center Priority (when applicable). An optional column is Quantity Action which would Increment or decrement the quantity in your file to the quantity we have stored.
-
- There are a few ways you prepare your upload:
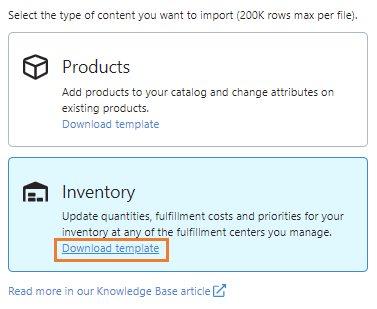
- Export an example template from the Import page (Products -> Import). You can then add the SKU's and quantities manually
- Export your current Products (Products -> Export -> Inventory). This will give you the current list of available quantities and you can edit those quantities within the same file.
- Supply your own custom file or upload a file from your Vendor/Supplier/secondary source.
- Marketplace Management has a custom mapping tool that will help take any file you have (with column headers) and adapt it to the values within our system.
- Export an example template from the Import page (Products -> Import). You can then add the SKU's and quantities manually
-
- Once you have your file, make sure that you have established column headers and that your columns are filled out correctly.
- Go to Products -> Import -> Inventory and import your file.
- Via the Mappings page, make sure that your columns are assigned to the correct field in our database.
- Process your upload!
For more information on how to update quantities and prioritize them, please references these resources!
How to update your quantities and prioritize Fulfillment Centers (Video)
Updating Quantities in bulk (Detailed overview)
Frequently Asked Questions
I noticed a column/field marked as "Quantity Action". What does that mean?
The "Quantity Action" field is best used when you are trying to add (increase) or remove (decrease) from available inventory. For example, let's say you have 100 quantities for your product. You want to remove 25 of those available units (so you would have 75 available). You can upload a file with "Quantity Action" = Decrease and "Quantity Available" = 25. This would leave the available quantity as 75.

Another option you have is to avoid "Quantity Action" altogether and instead just use "Quantity Available". So you would upload a file with SKU and the quantity 75 and assign 75 to "Quantity Available".

Do I always need to include the Fulfillment Center with my upload?
If your SKU's have more than one Fulfillment Center assigned to them then you will need to specify which Fulfillment Center you're updating.
If you only have one Fulfillment Center (your Default Warehouse) then you do not need to include the Fulfillment Center with your upload. You can just include SKU and quantity (and quantity action where applicable).